Frequently Asked Questions
Most FAQ
Please check out our Kestrel 5000 Firmware change log to view the differences in the various firmware versions: Firmware Change Log
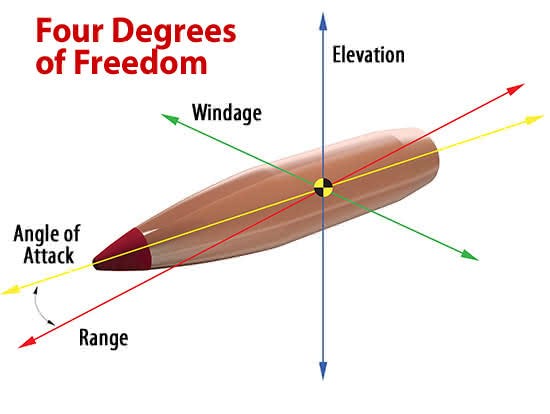
... Permalink4DOF is a ballistics engine created by Hornady for their bullets as well as other common long range bullets made by other manufacturers. The 4DOF solver utilizes a modified point mass solution which models bullet flight in 4 degrees of freedom to provide incredibly accurate trajectories to extremely long ranges. The software does not use Ballistic Coefficients (BC), but instead utilizes Drag Coefficient versus Mach number data measured with a Doppler radar for each projectile. While the 4DOF solver does not use traditional ballistic coefficient numbers, the Kestrel 5700 with Hornady 4DOF also includes a traditional G1 & G7 ballistics engine for use with bullets which don’t have a 4DOF bullet file available.
 ...
Permalink
...
Permalink
Due to differences in barrel machining, muzzle breaks, propellants and other factors, when the same bullet is fired from different rifles there will be a slight difference in the drag the bullet will experience. The Hornady 4DOF solver assumes the bullet will be fired from an "average" barrel but in reality your rifle may impact the bullet slightly differently. To account for any differences the Axial Form Factor value can be modified to align the output from the solver to what your bullet is experiencing. By firing at a known target and adjusting the Axial Form Factor value till the predicted solution matches real world results, you can calibrate the solver to match your rifle and bullet and deliver even more accurate firing solutions. Axial Form Factor can be calibrated using a target anywhere from 300 to 800 yards away and impacts the solution through the supersonic, transonic, and subsonic flight of the bullet.
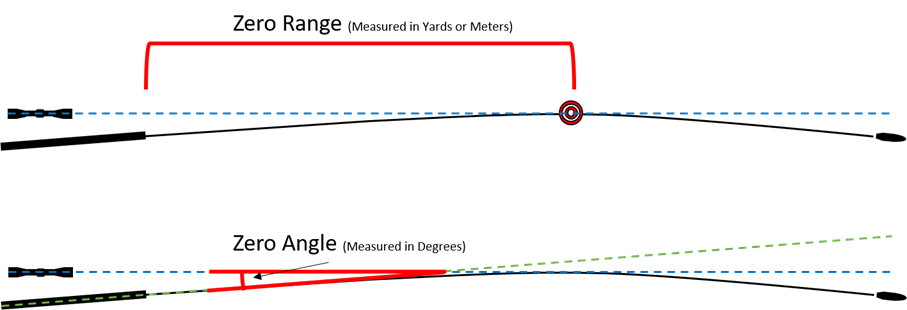
... PermalinkZero range is the distance from the muzzle to where a straight line following the axis of your scope crosses the flight path of the bullet. The scope is typically adjusted so this crossing point happens at 100yds but can be set further out. Because the flight path of the bullet can be impacted by changes in environmental conditions, the distance to that crossing point can vary with altitude or changes in the weather, notably if longer distance zero ranges are used. Zero Angle on the other hand is a measure of the angle between the straight line following the axis of the scope and the straight line following the axis of the rifle barrel. This angle is very small and would be difficult to measure directly but the 4DOF ballistics engine can find the angle when provided with environmental data and bullet impact location. Once the solver knows the Zero Angle between your rifle and scope a very accurate solution can be provided regardless of how long the zero range is or how much the weather changes. Read more about the Hornady 4DOF ballistics engine.
 ...
Permalink
...
Permalink
Zero Angle is available but it is not the default option. To find Zero Angle in your Kestrel, enter the gun menu and scroll down to Zero Range (ZR) and press the center button. In the Rifle Zero sub menu, highlight Zero Range and toggle left or right. Zero Range will change to Zero Angle and a Calibrate Zero Angle command will appear below it. Selecting Cal Zero Angle will open the Zero Angle Calculator tool.
In the Kestrel LiNK Ballistics app, enter the Gun Profile Editor where you build profiles and tap the Zero Range field name in yellow. In the pop up you will see an option to switch to use Zero Angle.
... PermalinkBecause not all laser rangefinder manufacturers use the Kestrel Ballistics Bluetooth Protocol to talk to a Kestrel, the Hornady Kestrel cannot communicate with some rangefinders which can talk to our existing ballistics meters. Check out this page to find the latest updates on which will connect with a Kestrel 4DOF unit: 3rd Party Devices
If you have a laser rangefinder with Bluetooth LE which you would like to have communicate with one of our Kestrel meters please contact the manufacturer and ask them to implement the Kestrel Ballistics Protocol in their rangefinder.
... PermalinkWhen calculating Zero Angle, the Hornady Kestrel asks for the distance to the Zero Target. This distance can be any distance you want but you’ll want to pick a distance where you’ll be able to accurately measure the distance between your point of aim and average point of impact with no elevation dialed or held when shooting. 100 yards or meters is a convenient distance and may be close to where your rifle is already zeroed.
Note: Just because your shooting range says a berm is at 100 yards, you should still confirm that distance with an accurate laser rangefinder or 100 yard tape measure.
... PermalinkAfter entering the Zero Angle sub menu, select Cal Zero Angle and then follow the prompts to enter the required data for your shooting environment and target. When shooting at your zero target, make sure your scope turrets are dialed to zero elevation, don’t hold any elevation in your reticle and place the cross-hairs directly on the target (point of aim). After firing enough shots to be confident of your average point of impact, measure the distance between your point of aim and average point of impact. Enter this value in the Cal Zero Angle calculator field asking for the Impact Height at Target, (impacts above the point of aim are positive and below are negative). After calculating the Zero Angle, press Exit and when prompted, accept the Zero Angle value.
... PermalinkThe Kestrel LiNK Ballistics app works with all of our Kestrel Ballistics meters. It recognizes the exact meter that you are currently connecting and changes to match that Kestrel.
... PermalinkPlease ensure privacy pin is not turned on. On the Kestrel, go to Main Menu->Bluetooth and press the center button. Then highlight Privacy Pin and turn off with left or right arrow. After doing this, try running the update again.
... PermalinkPlease try refreshing the cache on the webpage. To do this, press Ctrl-F5. If that does not work, then please try opening the order in an incognito window (Shift-Ctrl-n) . For MAC users on Safari, you can use [CMD] + [ALT] + [E]
... PermalinkPlease try this as a workaround:

Please try this guidance shown here:
Even though it shows connected, something is interfering with this connection. To troubleshoot:
- Ensure app permissions are set in your phone's app settings
- Reboot your phone
- Do a reset on the Kestrel. Take out battery, hold down power for 30 seconds, put battery back in
- Try reconnecting to the Kestrel Ballistics app
In general, there should be no special treatment needed for 22 LR compared to traditional rifle bullets if they are not being damaged during feeding. Since 22 LR projectiles are generally constructed of plated lead, they are soft and can deform easier than a traditional copper jacketed bullet during feeding or handling. If this is the case, I can believe that there would be observed differences between prediction and actual point of impact. 4DOF will handle any normal projectile dynamics that exist due to possible projectile dynamic instability that may occur at low mach numbers (transonic / subsonic).
Unfortunately, some 22 LR projectile shape’s are more prone to having dynamic instability issues than traditional copper jacketed projectiles. If the dynamic instability is severe enough (dependent upon shape, mass layout, twist, and angle of attack), it becomes impossible to predict the effects from a point of impact standpoint. Based on what I have observed with the RADAR it is possible that 22 LR projectiles will experience dynamic instability that will result in erratic point of impact results after certain time of flights that will not be able to be corrected by the shooter. The shooter is looking for a trend, I’m always hitting high or always hitting low to be able to troubleshoot, identify, and fix a problem that exists between the ballistic prediction and the observed point of impact. Unfortunately though, if impacts at 300 yds with a 22 LR are “all over the map”, this cannot be fixed by a ballistic solver.
The recommended process with rimfire would be the same as any centerfire system.
- Measure and input an accurate muzzle velocity.
- Ensure all inputs are correct pertaining to the rifle and bullet picked from the library.
- Conduct the find zero angle process.
- Shoot at distances equating to time of flights of .5-1.3 seconds (100-350 yds for most 22 LR). If there is a difference between the point of aim and point of impact, conduct the axial form factor calibration to account for the difference observed. ... Permalink
Here's a video that shows how to calibrate the compass and has some troubleshooting tips as well: Compass Calibration ... Permalink
"All measurements not available in all units"
Temperature Functions
For best accuracy when taking temperature measurements you must keep the air moving around the temperature sensor and keep the Kestrel out of prolonged, direct sunlight. If there is a strong breeze, just point the Kestrel into the wind. If there is no wind, swing the Kestrel around in a circle on its lanyard or rapidly wave it back and forth in hand. This ensures that the sensor measures the temperature of the air rather than the temperature of the case. Alternatively, if you have time, allow the Kestrel to rest where you want to measure the air temperature (NOT in your hand or in direct sunlight if there is no wind) until the case temperature equalizes with the air temperature. When equalized, the display will read a constant value. Be aware that this could take a few minutes, particularly if there is no wind.
Humidity Functions
One reason your Kestrel may not be reading accurate ambient humidity is because of proximity to humidity sources such as your hand, your body or the ground. Avoid covering the large humidity chamber opening on the case rear with your fingers. Keep all fingers below the finger groove and away from the chamber opening. Do not take reading that rely upon humidity with the Kestrel meter lying flat – raise it into the air vertically or stand it on its base and orient it into the wind or air flow. If a high level of accuracy is required for measurements involving humidity, do not hold the unit while taking measurements. Taking readings with the Kestrel in your hand or over your body can raise relative humidity by 5% or more. A Kestrel vane mount will isolate the Kestrel Meter from erroneous humidity influences and keep it oriented into the wind or air flow while taking measurements. Whenever you move your Kestrel Meter into a new environment wait until the primary sensor values have stabilized (Temperature, Humidity, etc.) before taking measurements that rely upon these values. After a large change in environmental condition, this may take 15 minutes or more, with humidity potentially taking the longest. If the humidity sensor housing (located above the rear label) is wet, the Kestrel cannot take an accurate humidity reading. If the sensor does become wet, shake the unit vigorously to remove the water, and then let it dry completely before use. If the sensor comes in contact with salt water, rinse it thoroughly with clean water, then shake it and allow it to dry. As is typical with humidity sensors, it is possible for the humidity sensor in the Kestrel to drift over time as described in the spec sheet. If your unit has a Humidity recalibration function, it can be returned to the factory or used with the Kestrel RH Calibration Kit to recalibrate its humidity readings.
Wind Meter Functions
Wind speed is highly dependent on surrounding obstructions such as buildings, yourself and the ground, with wind speeding up as it flows around and over obstacles and slowing down as it passes behind them. Even in an open area, Wind speed will be slower near the ground so ensure you are taking measurements at an appropriate height for your application. Hold the back of the unit directly into the wind. Holding the unit off-axis by 5° will reduce accuracy by 1%, 10° will reduce accuracy by 2% and 15° will reduce accuracy by 3%. Using a Kestrel Vane Mount will ensure the unit is correctly oriented into the wind and measuring accurate wind speeds. The Kestrel impeller housing can rotate in the unit. For best accuracy, ensure one of the three “arms” of the impeller housing is pointing straight up. The wind speed displayed by the Kestrel Meter is a 3 second rolling average. This allows the unit to provide a value that is more representative of the typical, ambient conditions but not capture peak speeds for instantaneous blasts of air.
Compass Functions
The compass in the Kestrel Meter is used for direction, crosswind, headwind/tailwind as well as for capturing various user inputs based on direction. When calibrating and when using the compass, it is important to hold the unit as vertically as possible. Any tilt in angle present when the unit is calibrated or when measurements are taken will negatively impact the accuracy of the compass reading. Many users will inadvertently tilt the Kestrel Meter away from themselves slightly when holding the unit. If a high level of accuracy is required, using a Kestrel vane mount on a leveled tripod for calibration and measurement can eliminate error.
Pressure Functions
All pressure and altitude measurements are made using the pressure sensor. Some units have a dedicated “Pressure” screen which shows Station Pressure, the raw pressure reading straight from the sensor. The Barometric Pressure measurement (Baro) displays the local Barometric Pressure using the Station Pressure measurement adjusted to the local altitude using the Reference Altitude value input by the user. The Altitude measurement displays the local altitude using the Station Pressure measurement combined with the Reference Baro value input by the user. To obtain an accurate barometric pressure or altitude readings, you must first know EITHER your location’s current barometric pressure OR your current altitude. If the Reference Altitude value is incorrect, the Barometric Pressure reading will also be incorrect. If the Reference Barometric pressure value is incorrect, the Altitude reading will also be incorrect. Because Barometric Pressure and Altitude are each dependent on the alternate reference value remaining constant, Barometric Pressure and Altitude cannot be accurately measured simultaneously. If your unit has a pressure recalibration function, a new Barometric Pressure calibration value may be input. If this value was not taken from a verified source (a local airport or weather station) with the Kestrel being calibrated at the same location as the reference device, pressure related measurements may be incorrect.
WBGT
When changing environments (such as moving form an air conditioned room to outdoors or removing the unit from your pocket) the unit requires between 8-15 minutes to equilibrate to its surroundings before taking readings. Take measurements at least 3 feet off the ground and in the same wind or air flow conditions as the people you are monitoring. Ensure the Kestrel is oriented into the wind and able to measure the full wind value. A tripod or pole mount and the Kestrel Rotating Vane Mount are ideal for ensuring accurate measurements. Differences in the reflectivity of ground surfaces such as grass or asphalt will impact measurements. Be sure to take measurements in the same solar/radiant heat environment as the people you are monitoring. Unlike best practices for other measurements, WBGT is intended to be taken in direct sunlight. As long as there is occasional wind the Kestrel has software that allows it to maintain an accurate WBGT reading despite being placed in direct sunlight.
Air Flow
Kestrel Professional Meters can calculate air flow through a duct by combining user input information about the size and shape of the duct with the measured air velocity. In addition to reading the instantaneous Air Flow off the main measurement screen, a more accurate result may be obtained by capturing an average air flow on the Min/Ave/Max screen while traversing the duct. Traversing consists of dividing the area of the duct into evenly sized sections and averaging the air flows at the center of all sections. By spending an equal amount of time at each measurement location and quickly moving between measurement locations, the average air flow measurement can provide a more accurate measure of the air flow in the duct. Capturing an average can be particularly helpful when measuring ducts with registers or dimensionally uneven air flow.

Evaporation Rate
(Kestrel 5200 Professional Environmental Meter) Kestrel Professional Meters can calculate a concrete evaporation rate (ACI 308) by combining a user input concrete temperature with measured air temperature, wind speed and relative humidity. Concrete mix temperature is generally measured with a probe or infrared thermometer and should be read at the time of making the evaporation rate measurement After inputting the mix temperature, hold the unit vertically, approximately 20 inches above the surface of the concrete while facing the rear of the unit directly into the wind. To avoid inaccurate Evaporation Rate readings due to thermal loading it is best to shade the Kestrel. (Be sure the source of shade is not obstructing the wind speed measurement.) The ACI recommends taking a 6-10 second average of the evaporation rate to account for fluctuating wind speeds. To measure an average Evaporation Rate, scroll right from the Evaporation Current Measurement Screen to the Min/Ave/Max Screen and press select to manually start and stop a capture.
... PermalinkYes. You can use the red "capture" button to easily delete letters and the backlight button to add blank spaces to the names.
... PermalinkYou will first need to create an account if you do not already have one. After you create an account, sign in. Click on your account name at the top of the page and select My Account. On the left of the screen, you will see Product Registration, select this option. Enter your purchase date, serial number and product name into the fields and then select Save.
... PermalinkWind Speed – NK sells factory calibrated replacement impellers that can easily be installed by the customer. NK recommends replacing the impeller every 2-3 years depending on usage.
Humidity – The Kestrel 5 Series and DROP data loggers employ a highly accurate, calibrated, digital humidity sensor. Based on the sensor manufacturer's specifications and NK testing, drift on this sensor over time is minimal and field recalibration is likely to degrade accuracy rather than improve it. Factory calibration to validate and certify accuracy at a minimum of two RH points is available from NK. Kestrel 5000 series units can also be recalibrated in the field using our kit RH Recalibration Kit . During the five-year warranty period, NK will repair, recalibrate or replace any Kestrel 5 Series or DROP which drifts more than +/-1% RH/year since the date of manufacture.
Temperature – The thermistor in the Kestrel 5 series should not need to be recalibrated. If you think your sensor is incorrect, please contact techsupport@nkhome.com
Pressure – The pressure in the Kestrel 5 series should not need to be recalibrated. If you think your sensor is incorrect, please contact techsupport@nkhome.com
... PermalinkPlease see our graphing guide:
... PermalinkOur article Understanding Pressure, Altitude and Density Altitude talks about Altitude and Barometric Pressure in great detail. The article also describes how to utilize your Kestrel to take these measurements.
... Permalink- screen (0)
- kestrel4000 (1)
- measurements (2)
- LiNK (9)
- app (2)
- mobile (1)
- bluetooth (7)
- data (6)
- firmware (6)
- upgrade (1)
- battery (5)
- kestrel5features (0)
- elite (3)
- sportsman (1)
- 5700 (8)
- 5700elite (1)
- hornady (13)
- 2700 (1)
- elitevssportsman (0)
- 5700vselite (0)
- kestrelvskestrelballistics (1)
- nightvision (1)
- calibration (2)
- BerryComplaint (0)
- (8)
- altitude (0)
- iphone (1)
- android (2)
- gunprofile (0)
- setup (0)
- laser (3)
- range (4)
- finder (3)
- rangefinder (3)
- terrapin (0)
- bushnell (0)
- steiner (0)
- m830 (0)
- conx (0)
- newcon (0)
- raptar (0)
- cugr (0)
- sig (0)
- kilo (0)
- 1800 (0)
- nitro (0)
- 4000vs5000 (0)
- VaneMount (0)
- chronograph (0)
- gun (0)
- densityaltitude (0)
- BarometricPressure (0)
- StationPressure (0)
- SyncBaro (0)
- SyncAlt (0)
- errormessages (0)
- inclination (1)
- slant (1)
- angle (1)
- target (3)
- impeller (0)
- temperature (1)
- humidity (0)
- blackglobe (0)
- Android (2)
- alerts (0)
- downloads (4)
- iOS (1)
- OSX (0)
- Windows (1)
- warranty (1)
- tune-up (0)
- training (0)
- wind (2)
- megaphone (0)
- repair (0)
- Products (1)
- ab (0)
- profile (3)
- loader (0)
- transfer (1)
- windows (1)
- manuals (3)
- troubleshooting (3)
- CoxBox (0)
- maintenance (0)
- 25 (0)
- SpeedCoach (0)
- heartratebelt (0)
- SUP (0)
- factoryreset (0)
- strokerate (0)
- speed (0)
- split (0)
- speedreading (0)
- storkerate (0)
- timer (0)
- bluesensor (0)
- blacksensor (0)
- wiring (0)
- strokemodes (0)
- display (0)
- StrokeCoach (0)
- rubber (0)
- bumper (0)
- backlight (0)
- installation (0)
- graphs (0)
- force (0)
- curve (0)
- angles (0)
- wash (0)
- riggers (0)
- power (0)
- work (0)
- slip (0)
- pitch (0)
- bushings (0)
- releasenotes (0)
- strokecoach (0)
- stroke (0)
- coach (0)
- speedcoach (0)
- ballistics (1)
- instruction (0)
- instructions (0)
- manual (0)
- K4Firmware (0)
- AverageWindDirection (1)
- WindRoseUse (1)
- accurateKestrel5seriesreadings (1)
- spraydrift (1)
- Dicamba (1)
- NaN (1)
- BadEnviro (1)
- ballisticsolutions? (1)
- HiDegError (0)
- chargingCoxBox (0)
- empoweroarlock (0)
- rifle (1)
- twist (1)
- gun (1)
- oarlock (0)
- port (0)
- starboard (0)
- KestrelLiNKiOSDataExportsolutions (0)
- email (0)
- export (0)
- issue (1)
- OarlockCalibration (0)
- pininterferance (0)
- dongle (2)
- link (9)
- 1000 (0)
- 2000 (0)
- 3000 (0)
- 2500 (0)
- 3500 (0)
- blank (0)
- issues (2)
- connect (4)
- connecting (2)
- pair (2)
- pairing (1)
- kestrel (8)
- heart (0)
- rate (0)
- belt (0)
- find (0)
- Speedcoach (0)
- GPS (0)
- Firmware (6)
- Update (6)
- Bluetooth (7)
- Live (0)
- Link (9)
- speedocach (0)
- gps (0)
- oc (0)
- sup (0)
- live (0)
- stream (0)
- remotely (0)
- phone (0)
- logbook (0)
- ios (1)
- error (0)
- compare (0)
- boats (0)
- rowing (0)
- crew (0)
- varsity (0)
- 8 (0)
- mac (0)
- osx (0)
- application (0)
- program (0)
- software (0)
- cellular (0)
- wifi (0)
- coverage (0)
- model (0)
- multiple (0)
- two (0)
- empower (0)
- viewed (0)
- trainingpack (0)
- streaming (0)
- cloud (0)
- different (0)
- which (0)
- stream.live (0)
- one (0)
- boat (0)
- oar (0)
- length (1)
- inboard (0)
- oars (0)
- span (0)
- outboard (0)
- register (1)
- magnetic (1)
- declination (1)
- var (1)
- variable (1)
- true (1)
- noth (1)
- magnet (1)
- compass (3)
- direction (2)
- hailer (0)
- blueocean (0)
- charging (0)
- capacity (0)
- usage (0)
- device (0)
- dataplan (0)
- celluar (0)
- crack (1)
- door (1)
- defect (1)
- Kestrel (8)
- waterproof (1)
- defective (1)
- line (1)
- 5000 (3)
- change (1)
- changelog.software (1)
- code (1)
- update.difference (1)
- version (1)
- VER (1)
- Ruger (0)
- ammo (0)
- ammunition (0)
- wizard (0)
- high (0)
- definition (0)
- window (0)
- small (0)
- adjust (0)
- monitor (0)
- subsonic (0)
- transonic (0)
- drop (0)
- scale (0)
- factor (1)
- long (0)
- muzzle (1)
- velocity (1)
- 22 (1)
- LR (1)
- 22LR (0)
- life (0)
- bars (0)
- shut (0)
- off (0)
- turn (0)
- on (0)
- solar (0)
- charge (0)
- pressure (0)
- wbgt (0)
- equation (0)
- formula (0)
- measurement (0)
- natural (0)
- wet (0)
- bulb (0)
- density (0)
- evaporation (0)
- rad (0)
- delta (0)
- dew (0)
- point (0)
- chill (0)
- heat (0)
- index (0)
- internet (0)
- connection (1)
- reconnecting (0)
- reconnect (1)
- difference (0)
- differences (0)
- corecoxbox (0)
- cox (0)
- box (0)
- changes (0)
- coxbox (0)
- core (0)
- 08 (0)
- backwards (0)
- compatible (0)
- harness (0)
- microphone (0)
- charger (0)
- cup (0)
- trade (0)
- discount (0)
- trade-in (0)
- in (0)
- Credit (0)
- connector (0)
- smart (0)
- additional (0)
- new (0)
- replaceable (0)
- update (6)
- maintain (0)
- salt (0)
- saltwater (0)
- water (1)
- corrosion (0)
- float (0)
- communication (0)
- wireless (0)
- upload (0)
- session (0)
- summary (0)
- csv (0)
- fit (0)
- download (0)
- distance (0)
- time (0)
- sensor (0)
- seat (0)
- accessory (0)
- accessories (0)
- gps.speaker (0)
- flex (0)
- record (0)
- start (1)
- begin (0)
- accumulate (0)
- purchase (0)
- come (0)
- date (0)
- set (0)
- daylight (0)
- timezone (0)
- zone (0)
- incorrect (0)
- nk (0)
- UN (0)
- number (0)
- lithium (0)
- batteries (0)
- ship (0)
- shipment (0)
- UPS (0)
- mail (0)
- view (0)
- text (0)
- texts (0)
- alert (0)
- maxordinate (0)
- bullet (4)
- course (0)
- instructional (0)
- learn (0)
- more (0)
- tutorial (0)
- how (0)
- button (0)
- cable (2)
- side (0)
- top (0)
- 5500 (0)
- 4dof (12)
- Hornady (13)
- holder (0)
- mount (0)
- tight (0)
- file (2)
- rebalance (0)
- Manuals (3)
- axial (1)
- form (1)
- aff (1)
- adjustment (1)
- create (1)
- sensitivity (1)
- table (1)
- mv (1)
- temp (1)
- mvtemp (1)
- drifting (1)
- recalibration (1)
- lose (1)
- losing (1)
- profiles (1)
- store (0)
- storage (0)
- targets (0)
- hold (0)
- cal (0)
- cps (0)
- calibrate (0)
- ballistic (0)
- solver (0)
- AB (0)
- tab (0)
- broken (0)
- replacement (0)
- longest (0)
- max (0)
- maximum (0)
- 3rd (0)
- party (0)
- apps (0)
- applications (0)
- capture (1)
- steps (0)
- getting (0)
- started (0)
- units (0)
- metric (0)
- imperial (0)
- mph (0)
- kph (0)
- celsuis (0)
- fahrenheit (0)
- bad (0)
- real (0)
- Elite (3)
- Applied (0)
- athlete (0)
- team (0)
- personal (0)
- account (0)
- dark (0)
- mode (0)
- sessions (0)
- maxpbr (0)
- NoGo (0)
- FarZR (0)
- hud (2)
- simultaneous (0)
- switch (0)
- screens (0)
- toggle (0)
- single (0)
- card (0)
- dope (0)
- remote (0)
- control (0)
- purpose (0)
- use (0)
- values (0)
- elevation (0)
- spin (0)
- drift (0)
- simultaneously (1)
- Picatinny (0)
- fw (1)
- back (0)
- light (0)
- red (0)
- white (0)
- notch (0)
- front (0)
- clip (0)
- drain (0)
- minimum (0)
- HUD (2)
- concrete (0)
- 5200 (0)
- pouring (0)
- pour (0)
- MK-III (0)
- Agriculture (0)
- Ag (0)
- Farming (0)
- Portlog (0)
- portable (0)
- bl (1)
- Rain (1)
- Gauge (1)
- tipping (1)
- buckets (1)
- quick (0)
- aj (0)
- accy (0)
- 1st (0)
- first (0)
- spddrp (0)
- dot (0)
- qkwind (0)
- wnddot (0)
- 12" (0)
- drill (0)
- accuracy (0)
- RainWiseNet (0)
- windlog (0)
- datalogger (0)
- dataloggers (0)
- reed (0)
- mkiii (1)
- mk-iii (0)
- rain (1)
- gauge (1)
- raingauge (0)
- agromet (0)
- telemet (0)
- MKIII (1)
- Anemometer (0)
- Wind (2)
- Sensor (0)
- Fan (0)
- Blades (0)
- Direction (2)
- Speed (0)
- Top (0)
- Relative (0)
- Cables (0)
- Wires (0)
- MAV (0)
- Mini (0)
- Aervane (0)
- Humidity (0)
- Temperature (1)
- Sensors (0)
- weather (0)
- station (0)
- receiver (0)
- IP-100 (0)
- CC3000 (0)
- Receiving (0)
- Signal (0)
- frequency (0)
- transmit (0)
- transmission (0)
- receive (0)
- packets (0)
- oracle (0)
- multi (0)
- factory (0)
- reset (0)
- reboot (0)
- refresh (0)
- unfreeze (0)
- Portable Weather Station (0)
- computer (0)
- laptop (0)
- Portable (0)
- Weather (0)
- Station (0)
- working (0)
- operational (0)
- logging (0)
- interval (0)
- intervals (0)
- 15 (0)
- minutes (0)
- telemetry (0)
- cell (0)
- fifteen (0)
- rainwise.net (0)
- down (0)
- offline (0)
- no (0)
- radio (0)
- signal (0)
- rainwise (0)
- rainguage (0)
- guage (0)
- clogged (0)
- rainfall (0)
- missing (0)
- count (0)
- assembly (0)
- outside (0)
- 6 (0)
- volt (0)
- panel (0)
- placeholder (0)
- id (0)
- google (0)
- itunes (0)
- realtime (0)
- plus (0)
- + (0)
- Profile (3)
- Loader (0)
- 4500 (0)
- library (0)
- broke (0)
- d1 (0)
- d2 (0)
- d3 (0)
- active (1)
- bore (0)
- height (0)
- site (0)
- scope (0)
- guid (0)
- os/x (0)
- disease (0)
- spread (0)
- virus (0)
- corona (0)
- covid (0)
- covid19 (0)
- contagious (0)
- fire (1)
- DOF (1)
- WD (1)
- ambient (0)
- environment (0)
- head (0)
- of (0)
- charles (0)
- regatta (0)
- hocr (0)
- gpx (0)
- 4072 (0)
- release (0)
- notes (0)
- latest (0)
- hosr (0)
- schuykill (0)
- quik (0)
- legal (0)
- legends (0)
- PWSWeather (0)
- WeatherUnderground (0)
- images (0)
- diagram (0)
- magnetospeed (0)
- magneto (0)
- v3 (0)
- sporter (0)
- MagnetoSpeed (0)
- military (0)
- V3 (0)
- Sporter (0)
- Chronograph (0)
- sd card (0)
- suppressors (0)
- silencers (0)
- lab barrels (0)
- projectiles (0)
- bullets (0)
- suppressor (0)
- rail adapter (0)
- spacer (0)
- bayonet (0)
- dashes (0)
- t1000 (0)
- target hit indicator (0)
- KestrelMet (0)
- disconnect (0)
- save (0)
- MK4 (0)
- notify (0)
- MK4-C (0)
- WS-2000 (0)
- WS-5000 (0)
- RAIN COIL (0)
- WS-1550-IP (0)
- WS-1900 (0)
- WS-2902 (0)
- WS-2902A (0)
- WS-2902B (0)
- WS-2902C (0)
- 6152-AIRBRIDGE (0)
- 6152-WEATHERBRIDGE (0)
- 6152-WEATHERBRIDGEPRO (0)
- 6152C-WEATHERBRIDGE (0)
- 6153-AIRBRIDGE (0)
- 6153-WEATHERBRIDGE (0)
- 6162-AIRBRIDGE (0)
- 6162-WEATHERBRIDGE (0)
- 6162C-WEATHERBRIDGE (0)
- 6163-AIRBRIDGE (0)
- 6163-WEATHERBRIDGE (0)
- 6250-AIRBRIDGE (0)
- 6250-WEATHERBRIDGE (0)
- 6250-WEATH (0)
- WS-0101 (0)
- WS-01PF (0)
- WS-01T (0)
- WS-0262A (0)
- WS-0270 (0)
- WS-04 (0)
- WS-04-WHITE (0)
- WS-0416 (0)
- WS-05 (0)
- WS-06 (0)
- WS-07 (0)
- WS-08 (0)
- WS-0800-IP (0)
- WS-0802 (0)
- WS-09 (0)
- WS-0900-IP (0)
- WS-10 (0)
- WS-1000-WiFi (0)
- WS-1001-WiFI (0)
- WS-1002-WIFI (0)
- WS-1075 (0)
- WS-11 (0)
- WS-110 (0)
- WS-1171 (0)
- WS-1171A (0)
- WS-1171B (0)
- WS-1172 (0)
- WS (0)
- WS-2002 (0)
- AmbientWeather.com (0)
- AmbientWeather.net (0)
- WS-100 (0)
- WS-1201-IP (0)
- WS-1401-IP (0)
- WS-1500-IP (0)
- WS-1900A (0)
- WS-50 (0)
- WS-50-WEATHERSTATION (0)
- WS-7078 (0)
- WS-7079 (0)
- WS-8478 (0)
- WS-8478A (0)
- WS- (0)
- 6250-WEATHERBRIDGEPRO (0)
- 6251-AIRBRIDGE (0)
- 6322-AIRBRIDG (0)
- OBSERVERIP (0)
- WEATHERBRIDGE (0)
- WS-1200 (0)
- WS-1200-IP (0)
- WS-8480 (0)
- WS-1400-IP (0)
- WS-1600-IP (0)
- WS-1001-AIRBRIDGE (0)
- WS-1050 (0)
- WS-1175 (0)
- WS-1201 (0)
- WS-1201-AIRBRIDGE (0)
- WS-1401-IP-WEATHERBRID (0)
- WS-2902B (0)
- WS-2902A (0)
- WS-2902 (0)
- WS-2000 (0)
- WS-2002 (0)
- WS-5000 (0)
- WS-8482 (0)
- WS-0262A (0)
- WS-50 (0)
- WS-8478 (0)
- WS-8480 (0)
- WS-1000 (0)
- WS-1001 (0)
- WS-1002 (0)
- WS-12 (0)
- WEATHERBRIDGEPRO (0)
- WS-1401-IP-WEATHERBRIDGE (0)
- PM2.5 (0)
- PM25 (0)
- WS-0265 (0)
- WS-0265-3000 (0)
- WS-84 (0)
- RC-8401 (0)
- WS-1173 (0)
- WS-1173A (0)
- WS-1280 (0)
- WS-2080 (0)
- WS-2090 (0)
- WS-2095 (0)
- WS-2801 (0)
- WS-5305 (0)
- WS-1070 (0)
- WS-1080 (0)
- WS-1090 (0)
- WH31B (0)
- WH31E (0)
- WH31L (0)
- WH31LA (0)
- WH31P (0)
- WH31SM (0)
- WH32B (0)
- WH32E (0)
- AQIN (0)
- WH31 (0)
- WS-3000-X3 (0)
- WS-3000-X8 (0)
- Weathercloud.net (0)
- 6250 (0)
- AIRBRIDGE (0)
- AMBIENTCAM (0)
- AMBIENTCAMHD (0)
- CWOP (0)
- EasyWeather (0)
- NANO (0)
- WS-3000-X5 (0)
- WS-4000 (0)
- WS-09-C (0)
- WS-091-C (0)
- specs (0)
- carrier (0)
- plan (0)
- WS-290 (0)
- WS-2902D (0)
- WS-8482 (0)
- WS-8482-KITS (0)
- cost (0)
- place (0)
- same (0)
- baro (0)
- barometric (0)
- public (0)
- others (0)
- can (0)
- see (0)
- WS-8480WS-2902C (0)
- WS-5050 (0)
- WS-1965 (0)
- OBSERVERIP2 (0)
- WeatherUnderground.com (0)
- WS-02A (0)
- WS-1000-BTH (0)
- WS-50-C (0)
- WS-1401-IP-WEA.WS-GL032 (0)
- F007TH (0)
- FT005TH (0)
- FT012TH (0)
- WS-03 (0)
- WS-2800 (0)
- WS-2801A (0)
- WS-8460 (0)
- WS-2902C (0)
- 6251-AI (0)
- Webcam (0)
- OBSERVERIP2.0 (0)
- PM25 (0)
- PM25IN (0)
- 625 (0)
- RC-8401A (0)
- RC-8465 (0)
- WH19 (0)
- WH2C (0)
- WH2F (0)
- WH32G (0)
- WH32M (0)
- WH3C (0)
- WH5 (0)
- WH6 (0)
- RC-6050 (0)
- RC-8300 (0)
- RC-8300-WHITE (0)
- RC-8320 (0)
- RC-8365 (0)
- RC-8370-BLUE (0)
- RC-8370-GRAY (0)
- RC-8370-GREEN (0)
- RC-8370-RED (0)
- RC-8370-ROSE (0)
- RC-8370-SILVER (0)
- RC-8419 (0)
- RC-8427 (0)
- RC-8473 (0)
- RC-8487 (0)
- WS-01 (0)
- WS-14 (0)
- WS-15 (0)
- WS-16 (0)
- WS-17 (0)
- WS-18 (0)
- WS-19 (0)
- WS-20 (0)
- WS-21 (0)
- WS-22 (0)
- WS-23 (0)
- WS-24 (0)
- WS-25 (0)
- WS-26 (0)
- WS-28 (0)
- WS-70 (0)
- connectivity (1)
- lost (1)
- WS-5000-IP (0)
- WH31PF (0)
- WC-FMWAC2K.WS-1965 (0)
- Amazon.com (0)
- globe (0)
- 5400 (0)
- stress (0)
- WS2902 (0)
- AMBIENTCAMHD3 (0)
- RC-1200BS (0)
- RC-1200BSNA (0)
- RC-1200BWDN (0)
- RC-1200MTTHA (0)
- RC-1200WB-IL (0)
- RC-1200WBA (0)
- RC-1200WBDN (0)
- RC-1200WSA (0)
- RC-1250CHA (0)
- RC-1400WBA (0)
- RC-1800WSTH (0)
- WS-2080A (0)
- WS-5050 (0)
- WC-FMWAC2K (0)
- RC-8461 (0)
- RC-9362 (0)
- WC-FMWAC2K WH31E (0)
- WS-1170 (0)
- WS-8365 (0)
- W (0)
- WS-1401-IPWS-1550-IP (0)
- Ambient Devices Forecaster (0)
- WR-111B (0)
- WR-112 (0)
- 9175-22 (0)
- WS-152B (0)
- WS-152BN (0)
- WS-208TBH (0)
- WS-228TBH (0)
- WS-G3303THB (0)
- WS-GL025 (0)
- WS-GL025-CM (0)
- WS-GL026 (0)
- WS-GL032 (0)
- WS-GL032-CM (0)
- WS-L0801TBH (0)
- WS-L0801THB (0)
- WS-L3303THB (0)
- WS-M0402THB (0)
- WS-M0921THB (0)
- WS-M201301TB (0)
- WS-M201301THB (0)
- WS-MDF0705THB (0)
- WS-YG302A-G (0)
- WS-YG302A-Y (0)
- 6322-WEATHERBRIDGEP (0)
- BAROMETER-26 (0)
- WEATHERSTATION-10 (0)
- WS-YG313-G (0)
- WS-YG313-Y (0)
- WS-YG315 (0)
- WS-YG332 (0)
- WS-YG357 (0)
- WS-YG365 (0)
- WS-YG633 (0)
- WS-YG634 (0)
- WS-YG640 (0)
- WS-YG709 (0)
- WS-YG710-6 (0)
- WS-YG710S-G (0)
- WS-YG710S-Y (0)
- WS-2700 (0)
- WS-8480A (0)
- Shipping (0)
- 6322-WEATHERBRIDGEPRO (0)
- 6357-WEATHERBRIDGEPRO (0)
- WEATHE (0)
- WS-8400 (0)
- 6322-AIRBRIDGE (0)
- Order Confirmation (0)
- F007PF (0)
- F007T (0)
- F007TP (0)
- F008PFN (0)
- 632 (0)
- WS-40 (0)
- WS-41 (0)
- WS-42 (0)
- WS-5300 (0)
- FT004T (0)
- FT005T (0)
- 9103-22 (0)
- 6357-AIRBRIDGE (0)
- AIRBRIDGE-RECEIVER (0)
- WEAT (0)
- 6251 (0)
- 6312 (0)
- 6351 (0)
- 6357 (0)
- WS-1401- (0)
- AmbientWeather.net AmbientWeather.com (0)
- AmbientWeather.net (0)
- AmbientWeather.com (0)
- WS-342 (0)
- TX-8340 (0)
- WS-8600 (0)
- WS-1000-WIFI (0)
- WS-1001-WIFI (0)
- TX-3110B (0)
- WR-111 (0)
- Affected Products AmbientWeather.net (0)
- Q-1400WB (0)
- WS-2902C-WS-2000 (0)
- ambientweather.com (0)
- WS-02 (0)
- WS-314 (0)
- TX-3102 (0)
- Affected Products AmbientWeather.com (0)
- BA212 (0)
- BA30806 (0)
- BASWAN (0)
- Fischer Instruments (0)
- WM-2 (0)
- 117-01 (0)
- 117-122-WOODBASE (0)
- 122-01 (0)
- WEATHERMOUNT (0)
- WEATHERMOUNT2 (0)
- WEATHERMOUNT-STAINLESS (0)
- WR-333 (0)
- WR-334 (0)
- TX-3107 (0)
- WR-091 (0)
- WR-088 (0)
- WR-089 (0)
- WM-5 (0)
- WS-2063 (0)
- WS-2063-W (0)
- WS-2063-W-P (0)
- rowing (0)
- strava (0)
- link (2)
- logbook (0)
- upload (1)
- fit (0)
- files (0)
- sync (0)
- sessions (0)
- bluetooth (2)
- xfr (0)
- sporter (0)
- app (1)
- connect (1)
- connection (0)
- no (1)
- power (0)
- turn (0)
- on (1)
- battery (0)
- d1 (0)
- d2 (0)
- d3 (0)
- kestrel (3)
- led (0)
- gun (2)
- profile (2)
- error (1)
- connected (1)
- ballistics (3)
- kestrelmet (0)
- name (1)
- names (1)
- enter (1)
- scroll (1)
- scrolling (1)
- tax (0)
- exempt (0)
- tax-exempt (0)
- taxes (0)
- free (0)
- order (0)
- sale (0)
- (10)
- long (2)
- range (1)
- lr (1)
- 22lr (1)
- true (1)
- centerfire (1)
- center (1)
- fire (2)
- share (0)
- weather (0)
- kmet (1)
- 6000 (1)
- underground (0)
- ambientweater.net (0)
- firmware (1)
- fw (1)
- updfate (0)
- spc (0)
- speedcoach (0)
- coxbox (0)
- oarlock (0)
- donge (0)
- Observerip (0)
- WS-1002-ip (0)
- WS-1600-IP (0)
- WS-1550-IP (0)
- bluetooh (1)
- iphone (1)
- ipad (1)
- change (2)
- log (0)
- update (1)
- drop (0)
- calibrate (1)
- calibration (1)
- direction (1)
- Soil Sensor Array (0)
- download (0)
- csv (0)
- data (1)
- kestrelmet (0)
- ObserverIP 2.0 (0)
- appear (0)
- appearing (0)
- showing (0)
- up (0)
- version (0)
- lightning detector (0)
- Weatherbridge (0)
- WS-5000-HEATER-AC (0)
- swingulator (0)
- use (0)
- empower (0)
- gate (0)
- oarsport (0)
- disable (0)
- inactivate (0)
- targets (0)
- hud (0)
- hide (0)
- not (0)
- show (0)
- first (0)
- 1st (0)
- quick (0)
- set (0)
- button. (0)
- Ambientweather.net (0)
- ssf (1)
- 1.49 (1)
- software (1)
- NANO-SD (0)
- no (0)
- estimate (1)
- speed (1)
- distance (1)
- mover (1)
- card (0)
- all (0)
- wind (0)
- capture (0)
- time (2)
- gps (0)
- wrong (0)
- locked (0)
- sig (0)
- sauer (0)
- 5k (0)
- 10k (0)
- air-soft (1)
- air (1)
- soft (1)
- dry (1)
- ammo (1)
- echo (1)
- suppress (1)
- filter (1)
- detect (1)
- berms (1)
- par (2)
- setting (1)
- length (1)
- longest (1)
- highest (1)
- wear (1)
- hold (1)
- shot (4)
- timer. (1)
- elapsed (1)
- filter (1)
- off (1)
- buzzer (1)
- mute (1)
- timer (3)
- batteries (1)
- life (1)
- how (1)
- delay (1)
- function (1)
- times (1)
- amount (1)
- presets (1)
- preset (1)
- group (1)
- saved (1)
- configuration (1)
- elite (1)
- code (1)
- practice (1)
- practiscore (1)
- score (1)
- shots (1)
- entry (1)
- rain (1)
- wet (1)
- pool (1)
- waterproof (1)
- withstand (1)
- ambientweather (0)
- ws-2000 (0)
- WS-1550 (0)
- ambientweather (0)
- ws-5000 (0)
- ws-3000 (0)
- weather station (0)
- Ws-5000 (0)
- WS-3000 (0)
- api (0)
- communication (0)
- protocol (0)
- ws-1000 (0)
- ws-2902-array (0)
- osprey (0)
- ambienweather (0)
- windows (0)
- osx (0)
- mac (1)
- new (1)
- WS-8487 (0)
- WS--2000 (0)
- issues (0)
- stop (0)
- working (0)
- sending (0)
- send (0)
- solutions (0)
- disconnect (0)
- Kestrel Met 6000 (0)
- heatstress (0)
- soil (0)
- moisture (0)
- kit (0)
- array (0)
- install (1)
- installation (0)
- sensor (0)
- v3 (0)
- display (0)
- issue (0)
- low (0)
- light (0)
- dark (0)
- night (0)
- optical (0)
- export (0)
- historical (0)
- past (0)
- shot-timer (0)
- shot (0)
- sensitivity (0)
- failed (0)
- google (0)
- pixel (0)
- live (0)
- stream (0)
- wi-fi (0)
- optimization (0)
- check (1)
- out (1)
- loading (1)
- purchase (1)
- stuck (1)
- personal information (1)
- 6000 (0)
- location (0)
- device (1)
- WS-5050 (0)
- ObserverIP2 (0)
- WS-1551-IP (0)
- ws-7078 (0)
- ws-7079 (0)
- AMBIENTWEATHERNETWORK (0)
- awn (1)
- add (1)
- additional (1)
- station (1)
- address (1)
- camera (0)
- better (0)
- resolution (0)
- share (0)
- public (0)
- ambient (0)
- met (0)
- internet (1)
- wifi (1)
- setup (1)
- kesterlmet (1)
- Humidity (0)
- ssf (0)
- scope (0)
- correction (0)
- sight (0)
- scale (0)
- factor (0)
- Rain (1)
- rain reset (0)
- WS-1938 (0)
- Indoor (0)
- Outdoor (0)
- WH31E (0)
- PM25in (0)
- WH31P (0)
- WH31PF (0)
- WH32B (0)
- barometeric pressure (0)
- heat stress (0)
- heat stress monitoring system (0)
- indoor sensor (0)
- outdoor sensor (0)
- ambientweather (0)
- non (0)
- metal (0)
- target (0)
- proof (0)
- hit (0)
- indicator (0)
- ws-1965 wh31e (0)
- kestrelmet.net (0)
- garmin (0)
- 901 (0)
- fortrex (0)
- compatible (0)
- WH51LW (0)
- changelog (0)
- WS-2902E (0)
- WS-1553-IP (0)
- WS-8480A (0)
- WS-4000 (0)
- tipping (0)
- bucket (0)
- gauge (0)
- Ambient Weather Network (0)
- Metric (0)
- Imperial (0)
- starting (0)
- boot (0)
- loop (0)
- rebooting (0)
- beep (0)
- beeping (0)
- Console (0)
- blank (0)
- black (0)
- New (0)
- Array (0)
- existing (0)
- console (0)
- talk (0)
- communicate (0)
- resync (0)
- humidity (0)
- readings (0)